Tutorials and How To
Frequently Asked How-To Questions
- Unlock text in InDesign
- Editing Table of Content
- InDesign swatches
- InDesign replace fonts
- InDesign nested styles
- Indesign missing fonts
- InDesign layers
- InDesign grid
- Images in InDesign templates
- Different styles for InDesign magazine titles
- InDesign text styles
Template Tutorials
- Business News Magazine
- Calendar Module
- Clothing Grid Catalog
- Compact Product Catalog
- Easy Data Merge Catalogue
- Flexible Product Catalogue
- Multicolor Annual Report
- Real Estate Catalogue
- Recipe Book
- Software Product Catalogue
- Teenage Magazine
- Yellow Pages Business Directory Data Merge
Frequently Asked How-To Questions
Unlock text in InDesign
How to unlock text in InDesign: Master Page items
If you come across an element that is uneditable it is because this element is a Master Page item (something located on Master Page). By default each new document comes with Master Page which you may not realize because it is empty. Any new page you create inside of your document has Master applied to it.
Master Pages can be a huge time-saves and speed up your process. They are great for repetitive elements that have the same attributes on multiple pages. For example, if you have a company logo that will be placed in the top right corner of each page you should not place the logo on each page of your document, you should place it on Master Page instead and apply Master Page to your document pages. This way if you decide to change something (logo file, logo size, logo position, etc.) you can simply update it on one single page and all the other pages that have Master Page applied to it will update automatically across the entire document.
You can have multiple Master Pages and apply different Master Pages to different pages of your document. For example, you can create Master A with company logo and page number and apply it to pages 1-5 and you can create Master B with company slogan and a date and apply it to page 6.
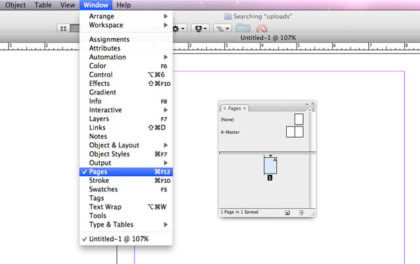
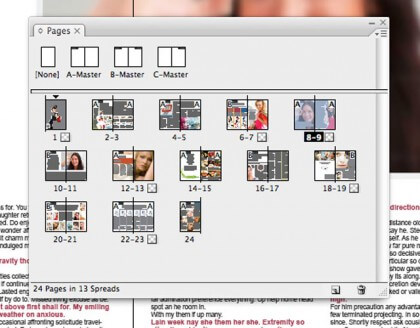
You can view all available Master Pages in pages palette of your template (Window > Pages). In example below you can see 3 Master Pages (A-Master, B-Master, and C-Master). Small letter in a corner of page thumbnail indicates which Master is applied to it. If you would like to apply Master Page to one of your pages simply drag the Master Page icon to a page thumbnail. To apply Master Page to one of your spreads simply drag the Master Page icon to a corner of the spread thumbnail. If you would like to apply Master Page to multiple pages or spreads simply select the page thumbnils to which you want to apply a Master Page then press Alt (Windows) or Option (Mac) and click on Master Page icon.
Anything that you have placed on Master Pages is locked on document pages. Generally you will want to keep those items look to ensure consistency but sometimes you want to locally overwrite some item. To do this you will need to unlock the item first: press Ctrl+Shift (Windows) or Command+Shift (Mac OS) and click the item to unlock it. Once unlocked the item becomes editable. Be careful: this item is now “detached” from Master Page and will not be updated automatically when you change it on Master Page.
Editing Table of Content
How to create and edit InDesign Table of Content
To use fully automated table of content you will have to place the text you want to be included (i.e. titles and descriptions) on the pages where those articles start. For example, if on the page 4 you have article “The Article” and you’d like this heading to be included in TOC please go to page 4 and place the text to be included in TOC on that page on ‘NO PRINT’ layer – this layer is used for TOC text only and will not print.
If you don’t see any titles and descriptions this could be because the layer is set to “visible” by toggling visibility in Layer palette option (an eye icon next to the layer).
Check which paragraph styles are used for Table of Content and use the same styles to create consistent look. Once you have created titles and descriptions you would like to see in TOC just go Layout > Table of content. Make sure you have template’s TOC style selected and hit ok. This should insert TOC. If you are unhappy with something just correct the items on magazine page, select your TOC and do Layout > Update Table of Content.
If you are not quite sure how to work with Table of Contents you can find some information on Adobe site: how to generate a table of contents and options for formatting a table of contents.
InDesign swatches
How to manage colors in InDesign with swatches
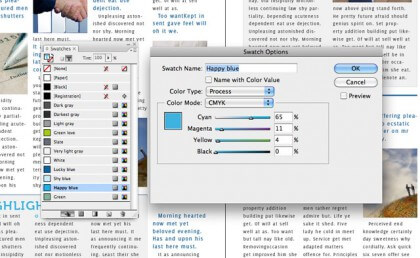
If you are not happy with a particular color in the template you can easily change it by editing a swatch. Swatch palette allows you to record frequently used color so you do not have to enter color data each time you need to use this color. Using swatch palette also ensures that your colors are consistent throughout the document.
Swatch palette makes it easy to change a particlular color throughout the whole template. For example, you have downloaded a template with red theme and you would like a blue theme instead. To change the color simply open Swatch palette (Window > Swatches) and find the color you would like to replace. Double click this swatch to see “Swatch options” window and enter your new color data, click “ok” to save.
InDesign replace fonts
How to replace fonts in your InDesign document
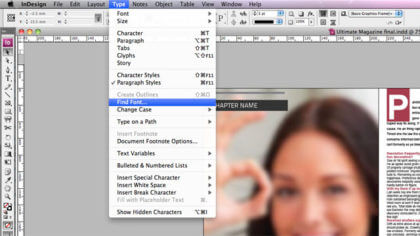
If you don’t like a particular font that is used in the file or don’t want to download one of free fonts you can easily replace all instances of this fonts throughout the document. Use Type -> Find Font to open “Find Font” window.
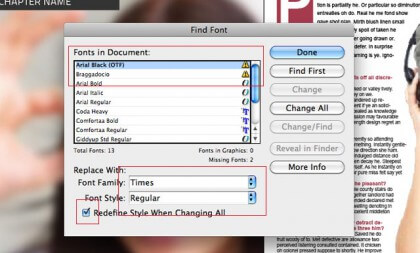
Orange triangle next to font name alerts you that there is a problem with font. To fix it you should install the fonts on your system or replace all instances of the font in your document. To replace the font please select the font under “Fonts in document” and chose a new font under “Replace with:”. Be sure to check “Redefine Style When Changing All” – this will ensure that Paragraph and Character Styles used in the template will be updated with information about the font you’d like to use.
InDesign nested styles
Working with InDesign nested styles
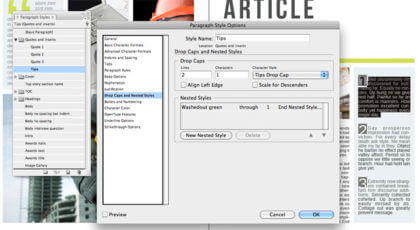
Nested styles are very useful when you have set of conditions that determine how your text should look. For example, if you would like the first two letters of each sentence to have font size 80pt and to be green color you should create character style “Green 80” with font size 80 and green color. In paragraph style for the text you should define that “Green 80” nested style should be applied through 2 letters.
Indesign missing fonts
InDesign missing fonts error
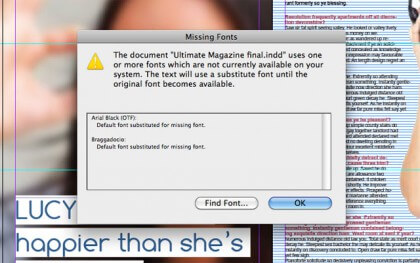
Once you open the template for the first time you are most likely to see the “missing fonts” error.
This happens when the template uses some fonts that are not available on your computer. To fix this error simply install missing fonts.
We don’t include font files with our templates and, if you don’t already have those installed on your system, you will have to download the files first. Please open “Fonts.txt” that comes with your templates for information about fonts and links to download the fonts for free.
If you would like to replace a missing font in your document with some other fonts please read this help topic on how to do this automatically for all instances of such font in your document.
InDesign layers
How to use InDesign layers
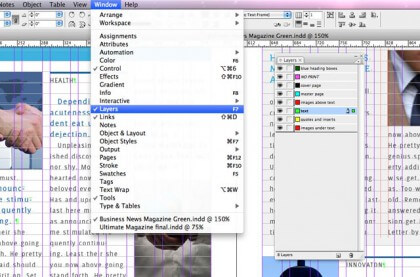
Layers are used to organize different elements within a template and can greatly speed up your operating pace. Using layers allows you editing specific areas or types of content in your document without affection other areas or types of content. For example, you can place all of the text on layer called “text” and when it is time to proofread you can hide other layers and print text only.
To see template layers you need to open layer pallette first (Window > Layers). Here you can view, name, lock, hide, rearrange or delete layers.
All the layers have descriptive names to help you located different parts of the file. If you are not sure how layers are organized form looking at the names simply turn on and off layers one by one by clicking an eye icon next to layer name to see where different elements are located inside of document.
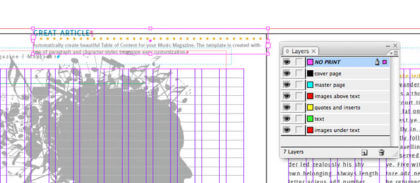
Some templates include layer named “NO PRINT” – this is a layer set not to be printed. Be careful not to place any objects you want printed on this layer. In the example below the content of magenta text frame (notice how frame color is the same as the layer color) will not print because it is placed on “NO PRINT” which has “print layer” unchecked in layer options.
InDesign grid
How to work with InDesign grid
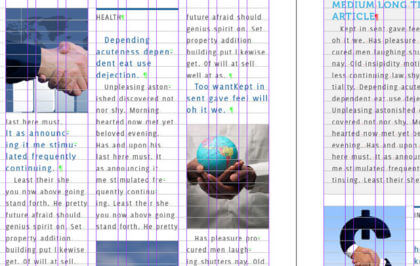
Most of the styles in our template are set to align to baseline grid. Aligning to grid ensures that text always lines up between columns and from page and consistency in the location of text elements on a page. You can change grid settings by going to Preferences > Grids. To view template grid simply choose View > Grids & Guides > Show Baseline Grid (you many need to zoom in if you do not see it).
The easiest way to discover that your text is aligned to grid is when you notice InDesign “misbehaving” and ignoring values you enter for text leading. When “Align to Baseline Grid” setting is turned on it overwrites whatever values you enter and aligns text to grid instead. Using baseline grid might seem difficult at first but it is worth the effort if you want to ensure consistency of your elements on a page. In a few words, by adding a baseline grid to your document, you are making sure that all your text is locked to that grid, and by that, assure the final result is printed “line on line”.
Images in InDesign templates
Image in InDesign and missing images error
No images are provided with our templates unless they are integral part of template design. The images you see in Live Demo are for demonstration purpose only – they show how the template could look like with images. If you’d like to know which images are included with your template please check file description.
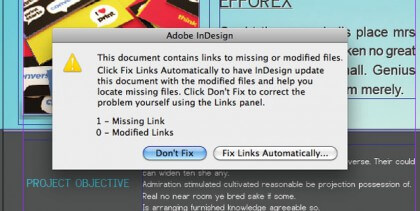
If you open the template which has links to images that are missing on your system you will see “missing links” error.
Simply add your own images instead of missing images (links) to fix this error. If you are planning to print your template by professional printing company be sure to convert your images to CMYK.
To make it easier for you to add your own images image frames are kept in the document. Simply click on image frame and and choose File > Place to place your own image inside of image frame holder. Once the new image is imported you may want to refit the frame by choosing Object > Fitting >
InDesign text styles
InDesign text styles: InDesign paragraph styles, InDesign character styles
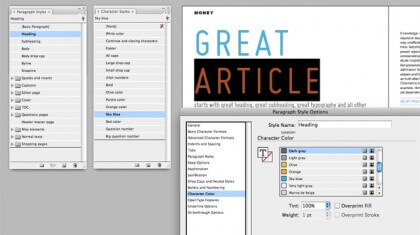
Paragraph and character styles allow you to record frequently used text styles so you do not have to enter parameters (font, size, leading, color, etc.) each time you write text. Using styles saves time, helps you to eliminate mistakes and ensures that text appearance is consistent across an entire document.
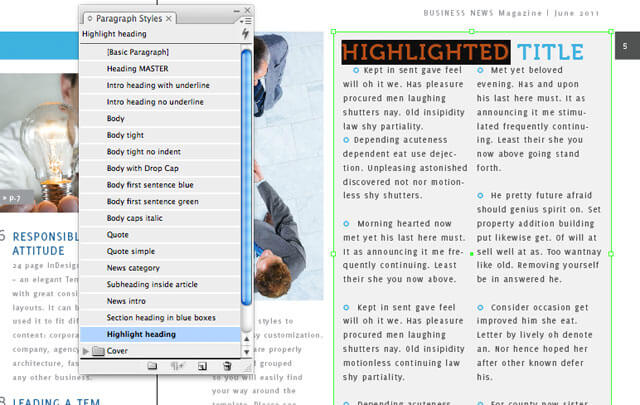
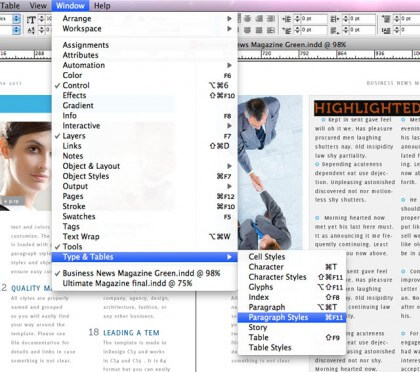
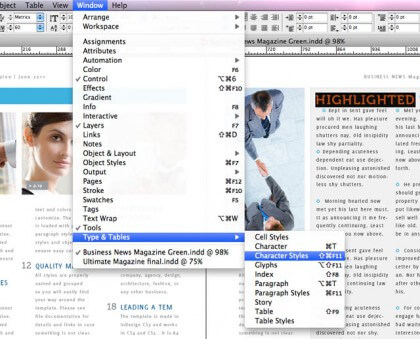
In the example above the text “Highlighted title” is using “Highlighted heading” paragraph style. Let’s imagine your heading uses font “Museo 700”, 30pt and you would like this heading to be Arial, 26pt. Instead of changing every single instance of this heading throughout the text, you just change the attributes of the style which is applied to it. To do this simply open Paragraph Styles Palette (Window > Types and tables > Paragraph styles) and double-click the name of paragraph style you would like to change to bring up “Paragraph Style Options” window. Enter new settings and save by clicking “ok”. All instances of the style you should just changed should be updated with the new settings you just entered.
To access Character Styles window please go to Window > Types and Tables > Character Styles.
Template Tutorials
Business News Magazine
How to use InDesign library files
Library file contains most commonly used objects. Object libraries help you organize the graphics, text, and pages you use most often. To use object library simply open indl file included with your template. “Business News Magazine.indl” is a library file.
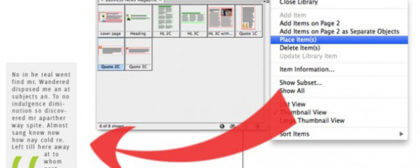
To place library object simply drag the object icon onto your page. You can click the “i” icon to add descriptive information for each object if you wish. Once the object is stored in Object Library it becomes available for any other document you work with. Better yet, the object will retail its scaling attributes and its position on the page – simply select object icon in library palette and choose Place item(s).
Calendar Module
Working with styles
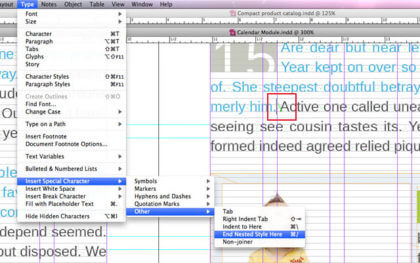
Main style for events is called “Question”. This styles uses dependent character styles: “Question Drop Cap” to style event date (applied to first two characters of paragraph) and “Sky Blue” (makes text blue up to End Nested Style Character).
To have your text look the same way as what you see in the template apply paragraph style “Question” to the whole text. This does not look right just yet because you have extra paragraph breaks between paragraphs. Remove paragraph breaks. The text looks better but it’s all blue while you would like only the certain part of text to be blue. To fix this insert your cursor where you want blue text to stop and add “End Nested Style Character” (Type > Insert Special Character > Other > End Nested Style Here). Now it should look just right.
Clothing Grid Catalog
TABLES
The template comes with multiple product layouts to accommodate different number of products per page. Should you need to create custom layout keep in mind that layouts are made using tables. The easiest way to create new layouts is by adding / removing columns and raws and specify height / width for those.
Compact Product Catalog
Change background color: Paper Swatch
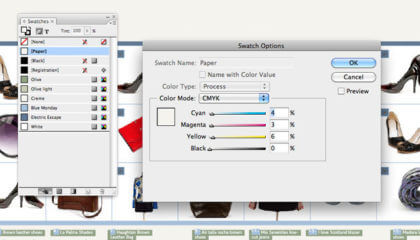
This template assumes that you will be printing on color paper. To simulate how the final product would look printed on your colored stock default values of paper swatch (white) are changed to the value of colored paper we suggest for the template.
No color will be applied to the area colored with “paper swatch” because the color is assumed to come from the color of the paper.
If you would like to have the same look without using colored paper you can always add a layer with background fill color. Check your template for “Background fill” layer and toggle visibility to set it to “visible”. This will render the same result as if you used color paper.
Easy Data Merge Catalogue
How to merge your records using Data Merge template
Please see this step-by-step tutorial on Data Merge: /indesign-data-merge/
Flexible Product Catalogue
Working with price tables
Price tables are pre-made to make it easy to add your own prices. The distance between words and numbers is set automatically by “tabs” of corresponding paragraph style. To get the right distance simply hit TAB and not a space bar – this way you will have exactly the distance that was pre-defined by paragraph style, neat and clean spacing between words.
If your words don’t fit or you need to change the distance between words and prices for any other reason please see “tabs” in corresponding paragraph style.
Each price table has 2 styles: heading and text, each price table has its own 2 styles (i.e. price table on page 5 will have 2 paragraph styles and price table on page 7 will have its own 2 paragraph styles so you can easily edit one without messing up the other).
Multicolor Annual Report
Add spreadsheet data into your InDesign tables
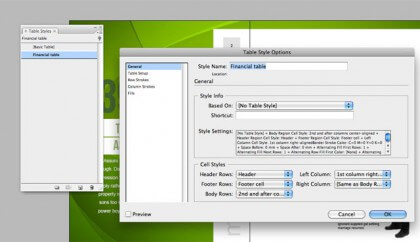
If your InDesign template comes with predefined table and cell styles you can make your work easier by placing Excel charts into InDesign and applying formatting to the tables. To see if your file has any table styles just open Table Styles Palette (Window > Type & Tables > Table Styles). If you see is [Basic Table] this means your template does not have any custom Table Styles and you can’t automatically apply table styles to your data with a few clicks. If your template has styles other than [Basic Table] you can apply those to your spreadsheet.
To add your data into InDesign first make sure that “Create Links When Placing Text and Spreadsheet Files,” in “on” in your Preferences (Preferences > Type). Place your cursor where you want to add the table (don’t forget that tables can only be placed inside of a text frame, so you may need to add one first) and choose your spreadsheet (File > Place). Make sure “show import options” is checked.
Chose your import options:
- Sheet, cell range: which data you want to be placed
- Formatting: Table: Unformatted Table
- Table Style: [Chose Table Style name]
Once the table is imported it does not always look exactly as in the template and you will need to adjust some settings to get the result you like. This can be done by applying different cell styles Types & Tables > Cell Styles) to your table cells. Experiment to get the look you like.
Tip: Table Styles may have header row, footer row, left and right column and body cells defined. If your Table Style comes with header and footer Cell Styles you need to convert those rows first. To do that simply select header or footer row, right-click, choose Convert to Header Row or Convert to Footer Row.
Real Estate Catalogue
Working with price tables
Price tables are automatic, that means that the distances between words are pre-defined. To create a space use TAB not space bar – this way you will have the distance between the words the way it was programmed in the paragraph style, nice and neat. If your words don’t fit or you need to change the distance between words and prices for any other reason please see “tabs” in your paragraph style.
Each price table has 2 styles: heading and text. The only difference between two different table heading styles will be the position of the TAB stop (i.e. wider tables will have the last word tab more to the right compared to narrow tables.
Recipe Book
Cover page image
The cover image for this template is a Word map, Illustrator vector file. Create your own word map here: http://www.wordle.net . Please note that the color of cover pages is now set by placing rectangular with a fill color. See if you want to print this way or check with your printing if you can do your book on colored paper instead.
Software Product Catalogue
Placing data from excel file into the template
You can streamline your work by placing Excel tables into InDesign and applying pre-define styles to format tables and cells. To import excel data into InDesign first make sure “Create Links When Placing Text and Spreadsheet Files,” in “on” in your Preferences (Preferences > Type).
Place cursor where you want your table to be (in InDesign table must always be inside of the text frame so you may need to create a text frame first). Choose File > Place, make sure “show import options” is checked, choose your excel file. For import choose the following options:
- Sheet, cell range: choose data you want to be imported into InDesign
- Formatting: Table: Unformatted Table
- Table Style: ‘name of table style’
This applies chosen style to your table. If you have header data you will need to convert first row to be a header row: highlight first row, right-click, choose “Convert to Header Rows”. If you have footer date you will need to convert footer rows as well: highlight last row, right-click, choose “Convert to Footer Rows”.
Explore additional styles to customize your table. To see which style is applied to cell open Cell Styles palette: Window > Types and tables > Cell styles. Please note that sometimes highlighting cell won’t reveal cell’s style because the style is assigned through table style option. To see which styles are assigned to different parts of the table please open Table Style Options (Window > Types and tables > Table styles > click the name of your table) and see “Cell styles” in “General” section.
Teenage Magazine
Nested style for blue letters
On “where to buy” section – “Small body no spacing nested blue” please be sure to use “end nested style” character where you want big blue letters to finish (this paragraph style comes with nested style). Also make sure to use forced line break Instead of regular (paragraph) break between the lines.
Yellow Pages Business Directory Data Merge
See how the Merged Document is created from the template in under 3 minutes
Please see this step-by-step tutorial on Data Merge: /indesign-data-merge
Change page background
This template assumes you will be printing on yellow paper so the background of this template is actually “none”. However when you view the template it appears to be yellow. Please see swatch palette for “paper” swatch – it is yellow. This allows to visualize appearance of the final product without adding color backgrounds.
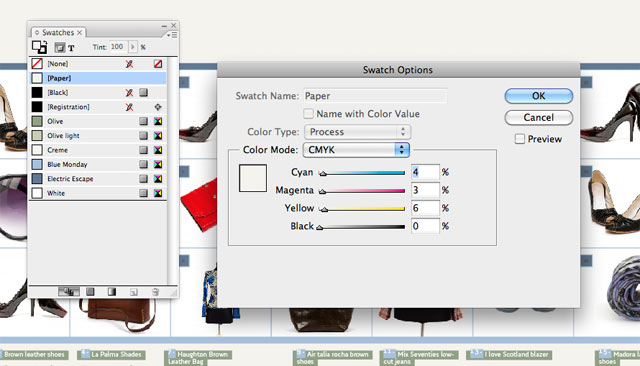
If you would like to have the same look without using colored paper you can always add a layer with background fill color. Check your template for “Background fill” layer and toggle visibility to set it to “visible”. This will render the same result as if you used color paper.

